

Play the game! Q7L-CHW-X7G
Open your Super Mario Maker 2 game, navigate to Course World, and type this code into the “Search ID” feature to find my Maker profile. Then select the Play button on the right side of the screen.
What other players are saying
This was such a breath of fresh air…I mean it in the best way possible when I say this feels like a romhack. It reminded me of JUMP… – Cipher_
You’re really good at implementing difficulty in unique ways! – FineTunedBenjo
This is really really cool, thanks for putting in so much effort for us to enjoy! – Wabalywoo
A Mario game within a Mario game
This fully featured Super World for Super Mario Maker 2 is packed with all kinds of traditional and creative challenges!
- Traditional, creative, and new!
- For intermediate and expert players
- 18 main courses spread across 4 main worlds
- Fun surprises like scripted cinematics and a Metroidvania style desert world
- Custom bonus mini-courses that call back to classic Mario games
- 3 hidden 1-Ups in every course
- Find the World Secret in each world to unlock 3 devilishly difficult special courses!
Watch the trailer!
Credits
Music Guides
Contraptions Guide
Andy Diamos
Louis XIX
Loup&Snoop
Black Dragon
James Lee
and many more contributors
Tech & Art
Drakim (SMB2 theme)
EneBs (chandelier)
Iamshyguy2 (block eating machine)
Katz (Thwomp train)
Mr.Elliot (SMB2 “turnips”)
SMH (background art inspiration)
Space_Pig (shell kicker)
Inspired by
Barb
Kiavik
Trakkan
My beautiful wife <3
Level gallery and dev commentary
1-1 | Big Red Gets Nabbed!
Code: Y4K-5VM-DHF


I decided to make a Super World for intermediate/expert players. This first level starts with a cinematic chase scene. Well, as cinematic as Mario can get at least.
I drew Mario levels all the time as a little kid, so I’m really indulging myself here. It’s also a creative way for me to relax.
In this level, a scripted cinematic shows Mario’s friend Red Yoshi getting kidnapped from his house by Iggy right in front of Mario, so Mario has to chase after Iggy.
1-2 | Cape Spin to Win [WS]
Code: 75H-9G0-6MG


Level 2 is focused on deflecting spike balls with your cape. Pretty easy. Perhaps too easy?
I started this one with the goal to make an Ultrastar type level from the kaizo romhacks that’s accessible to intermediate players.
That’s tricky because you can easily end up with a boring level since the thing that makes those levels interesting is their difficulty. I think the spike balls add a needed twist.
1-3 | Fire Swamp Romp
Code: PBQ-CR0-MTF


Beware the ROUS (Rodents of Unusual Size!) in the music level ‘Fire Swamp Romp’, the 3rd level in my Super World.
This one started life as a non-kaizo music level inspired by Mirkwood from Grand Poo World 2 and that’s pretty much where it ended up, with the addition of some visual references to The Princess Bride’s Fire Swamp.
This is my second music level but is the first I’ve uploaded. I ran out of entities on the first and have none left to build a level around, so it needs restructuring.
This level, however, plays pretty nicely! But if the music is familiar to you it will sound weird because it runs at a slower tempo than normal. If it doesn’t sound familiar, don’t worry. It will sound like I meant it to be like that. (I didn’t. I’m just new to making music levels.)
1-4 | Iggy Koopa’s Wild Ride
Code: 1N4-WD3-8VG


Here’s the final level of World 1. I am really proud of the boss fight, a chase across the whole subworld.
It’s a reprise of the first level, but each section you drop down into also calls back to the previous levels, including the first part of this level.
For the first part, I wanted to do some visual storytelling about why Iggy was riding on winged blocks and using claws and rails in the first level of this world, and I came up with the idea that he was obsessed with gears and machines.
So that gave me the idea of having Mario go inside some of those machines in the castle to gum up the works in order to progress.
1-BONUS | Star Road 3 Bonus
Code: W7W-987-TWG


I made each bonus level in this game to function as both a Multiplayer Versus level and as a custom mini-level that gives the player a chance to earn extra lives. Both types of levels must be fairly short, so it was pretty easy to serve both purposes with a single level adaptation.
This level deliberately calls back to Star World 3 from Super Mario World, but with modifications to fit the requirements above plus the limitations of Super Mario Maker 2.
Multiplayer Versus players will have a tough time fighting each other for the Lakitu clouds, and once those are gone they’ll have to seek alternative means up to the key.
And players of Super SWChris World will have to call upon their nostalgia to remember how to find the secret exit since the normal exit has been cut off.
2-1 | Khufu’s Coffers
Code: MTX-NGB-BCG


Here’s Level 1 of World 2, which is an SMB2 world. This world is an experiment at storytelling across levels. The blue pipes are blocked off, which is a bit of a mystery. The story is about these blue pipes in a way.
This level also takes inspiration from World 3-2 in Super Mario Bros 2, but it’s also an art level. Even so, I tried to keep the aesthetic as close to the original SMB2 as possible throughout this whole world, with vegetables you can uproot and all.
2-2 | Escape King Magi-Hotep’s Tomb!
Code: WW3-JNK-DVF


In World 2-2 you’re inside the tomb you entered at the end of World 2-1, and its occupant doesn’t like you taking his key.
This extends the story began in World 2-1, and introduces a villain. The key isn’t actually used here, but in the next level. You can’t actually carry items between levels in this game, but I’ve worked out a way to simulate it.
The level is mainly a vertical twin banzai bill riding level. You have to switch back and forth between the banzai bills as they approach different obstacles.
2-3 | Time and Again [WS]
Code: F2Q-VSM-DHF


World 2-3 is a time travel level! You start in the desert, then go backwards through an ancient oasis version.
The first part in the desert requires you to manage Phanto’s location as you dodge through narrow tunnels filled with fast moving Pokeys propelled by Thwomps.
You use the key you retrieved from the tomb you escaped from in the previous level to enter the time travel room, and arrive back in the past where there wasn’t quite as much… sand.
Then you re-traverse the level backwards dodging the palace guard, and re-enter the tomb and come face to face with… the ghostly Magikoopa who haunted you in the last level! Except he’s not dead yet!
The boss room is actually the end screen from the previous level as well.
And what do you get when you defeat him? Well, there are some blue pipes in this level too. Now you get a chance to unlock them, and change the future.
Fellow time travel enthusiasts will notice I’ve set up a kind of grandfather paradox. Because it turns out the ghost of the Magikoopa back in the tomb that Mario encountered was killed by Mario himself.
Here’s what Captain Janeway would say. “My advice for making sense of temporal paradoxes is simple; don’t even try.”
2-4 | Pyramid in the Sky
Code: PQ8-7GQ-1JG


Now we really get into the Metroidvania part of World 2! This level has you revisit World 2-1, except this time the blue pipes are open thanks to your time travel. Now you can use the cloud to access the cloud platforms you couldn’t reach before and fly up through the starry constellations to the giant pyramid in the sky.
This level also takes some visual inspiration from World 6-3 of Super Mario Bros. 2. But the main reason this level got made was because I wanted to draw constellations with tracks, and I think they turned out great. Keep an eye out for some fun cameos!
I’ll say a word about this here even though it’s really an observation about the entire game; I wanted to include some continuity between the end of each world and the start of the next one. The rocket ship you’ll see when you play this level and the next provides that link between the end of World 2 and the start of World 3.
At the end of each world you’ll also notice that the next world’s boss always flees just after you defeat the current world boss, which provides a through line for the whole game, starting with the chase after Iggy in the first level and ending at the very last level. Keep an eye out for this pattern because it was intentional storytelling.
2-BONUS | Hammer Bros. Battle
Code: 18X-NH8-RXF


This level calls back to the classic setup of two Hammer Bros. set on two horizontal brick platforms from Super Mario Bros. And since it is also a bonus level, it calls back to the reward you get when you defeat the Hammer Bros. in Super Mario Bros. 3.
Not only that, it completes the trifecta of references to all the mainline NES Mario games because the level starts you off as SMB2 Mario, which was unintentional. Mario only starts off as SMB2 Mario because this level is placed in the Super Mario Bros. 2 themed world of this Super World.
I made each bonus level in this game to function as both a Multiplayer Versus level and as a custom mini-level that gives the player a chance to earn extra lives. Both types of levels must be fairly short, so it was pretty easy to serve both purposes with a single level adaptation.
3-1 | Falling, with Style! [WS]
Code: KDJ-1NB-RKF


World 3-1 is a descent from the sky and teaches players how to maintain flight by bouncing on wigglers. The level is pretty safe, allowing for easy retries before the final test at the bottom of the subworld where there is no floor to land on.
And yes, the title is a Toy Story reference.
3-2 | Swim Fast “Die-t”
Code: TQP-LB5-8HG


Beat the munchers to the end of each section before they block you in. This level marks another jump in difficulty level for this Super World. Hopefully the last 5 levels prepare you adequately!
Another water level was originally slotted into this spot. But given that it’s really hard I decided to make that level a special course at the end of the game and build a new level instead.
This new level is easier but still challenging, and like the previous one is also based roughly on an “underwater sky tree” or “keep moving” concept.
3-3 | Welcome to Tube City!
Code: KN4-RHJ-W1G


Level 3-3 is a sendup to one of my favorite Super Mario Bros. 3 levels, World 7-1, with timed platforming sections in the second half. You’ll have to get into the pipe at the end before the snake block blows up the on/off switch and traps you.
Handy reset doors have been included, making this level much easier than the previous one. I’m fine with this because the alternating difficulties act like tension in a story arc in the sense that they give the player a bit of breathing room before tackling the next big challenge, which keeps their interest. Think about how your favorite movies or books are structured and you’ll see this technique used in every single one.
I’m also curious to see if players like this level or not. You can’t slide through pipes without switching screens, so I recreated this vertical level twice. Once in the horizontal overworld, and once in the vertical subworld. The pipe transitions in SMB3 World 7-1 were seamless so it’s something of an experiment to see if players will forgive the fade to back between each one.
There was an additional problem in the fact that the overworld can’t be vertical. So I used a trick I learned from watching DVD movie commentaries to sell the illusion that the horizontal overworld *is* vertical. That’s a weird source to get design knowledge, but Peter Jackson said something essential about how they sell the scale differences between hobbits and humans and dwarves and elves when they are on screen at the same time.
He said they do expensive visual effects shots to illustrate such differences when they are shown for the first time, which primes the audience to buy the scale differences later when they use simpler and more affordable film school techniques like simply making a hobbit actor crouch down next to Gandalf.
In the same way, I made sure that the player has to scroll the screen up beyond two screen lengths before they reach the first pipe transition, which you can’t do in a horizontal level, which primes him to believe he is playing a real vertical level all throughout and not just half the time when he is in the subworld like he is actually doing. And I repeated the technique for the final pipe room—long after the player has forgotten whether he is in the overworld or subworld—just to reinforce the illusion.
Finally, the name of this level comes straight from the Nintendo Power SMB3 strategy guide’s title for World 7-1, which I like to do whenever I build a level based on a SMB3 course. The last time I did this was for a level made with the original Super Mario Maker that was based on the World 8 Fortress. The guide had titled it “Multifarious Monster Fortress”.
3-4 | Bob-omb Battleships
Code: T2P-CN1-4NF


Level 3-4 is an autoscroll jaunt through Wendy’s battleship armada. There are also speedboats!
This the first level that takes inspiration from the 4 Year Mario Maker project, as it uses the “cannon” setup with the springs and bouncers to shoot the player from one boat to the next.
The start of the level begins with just such a cannon, with a door to retry for free if it takes you by surprise or you can’t figure it out. This makes the exact start a little klugey, but I think it’s a fair trade off for a cool mechanic.
I also wanted have aircraft bombers in this level, but the tracks required made the level look too busy and it was challenging to get the aircraft blocks to spawn correctly in the right arrangement.
If you make it to the midway checkpoint while big, you’ll get a nice guitar riff as you double stomp on the Hammer Bro and the Monty Mole on the speedboat at the same time.
I lucked upon that because it’s at most a 2-3 frame trick and depends on alignment of the autoscroll and speedboat to be in the exact right spot. So it only triggers if you’re big and don’t have to restart from the checkpoint.
3-BONUS | World 1UP Fortress
Code: C52-177-TWG


This is a recreation of the first part of the World 1 Fortress from Super Mario Bros. 3. The door to the dropping ceiling room loops back to the start instead, forcing you to find the secret exit.
As with the World 1 bonus level in my Super World, you’ll have to rely on your nostalgia to remember where it is. That’s it. That’s the challenge.
I made each bonus level in this game to function as both a Multiplayer Versus level and as a custom mini-level that gives the player a chance to earn extra lives. Both types of levels must be fairly short, so it was pretty easy to serve both purposes with a single level adaptation.
The challenge to Multiplayer Versus players will be in managing to keep your power ups as you dodge the other players and obstacles. You’ll also be rewarded for immediately going for the secret exit. Or, rather, you’ll be punished for going the scrub route.
4-1 | KEEP MOVING!!!! [WS]
Code: CH5-4FW-3DG


This world was going to see you climb up higher and higher until you reached a rocket or something that would have taken you to a World 5 set in space.
Those plans got cut when I started noticing the signs of burnout. I pared back this game to 18 levels instead and skipped straight over the space world to the final planned world. As such, you still climb higher and higher in World 4, but you then go straight to Antarctica, not space. Later, I repurposed the rocket idea to be the transition between Worlds 2 and 3.
This level has you avoiding some very hungry thwomp machines. I wanted to do a level like “KEEP MOVING!!!!” from Yoshi’s Island where the level gets eaten behind you. The Thwomp machines I used are from the Katz’s Tomb Train 4YMM level and Iamshyguy2.
4-2 | Ice Road Duckers
Code: H7V-FKB-RKF


Level 4-2 takes you higher still into the frozen peaks. Slide under the ice and dodge Spike’s snowballs.
This is my more accessible (but still challenging!) take on the ice sliding subgenre of kaizo Mario level, inspired chiefly by Barb’s Echo Base level from Grand Poo World. Unlike my homage to Mirkwood, this isn’t so much a copy as it is just using some of the same elements Barb used while injecting some new stuff into the formula.
One of my goals for this Super World is to make challenging “not-kaizo” levels that echo some of the best kaizo level designs that are possible in Mario Maker.
I’ve learned this is hard to do right because the difficulty is a big component of what makes those kaizo levels good. Take that away and many times you are left with a terrible level. I think this is the closest I’ve gotten to achieving accessibility without sacrificing level design.
One last note: I finally found a use for my ski lift that actually complements the level design! I’ve been hanging onto that one for about a year now.
4-G | Teresa Chateau
Code: 10V-958-BQG


This is my 1st puzzle level. Since it’s Ghost House themed, I used techniques to disorient the player, like Kubrick-style architecture, twice-twice rooms, and staircases.
When Stanley Kubrick filmed The Shining, he intentionally depicted the layout of the hotel in a way that is not physically possible. For example, there are hotel room doors on the side of the hallway in that movie where there shouldn’t be any because the hotel lobby is on the other side.
Twice-twice rooms are rooms that look mostly identical but are actually different areas. And using staircases the way I’ve used them also increases disorientation, but I can’t tell you how without spoiling the level’s solution. You’ll have to play it for yourself.
Since I’m using misdirection, I decided to also leave visual hints pointing to the proper direction to go. They need to be subtle enough to be missed, but obvious enough that they should pop into the player’s mind as soon as they find the solution if they didn’t catch them already, otherwise it’ll feel as unfair as a badly made troll level.
Now even with all that, I think the puzzle design is pretty basic, but that’s because I know where everything is! We’ll see how difficult it ends up being once it gets released to the wider world.
Let’s talk aesthetics. I made the exterior first. I knew I wanted a haunted courtyard like in Mario 64 and I also knew the puzzle design would depend on the courtyard’s layout, so I built that first. I used mushroom platforms to depict the sides of the house and a semisolid as the courtyard wall.
I knew you can only overlap five background objects at a time, but I’m using way more than that so I had to see what was possible before I made a whole level around this setting.
It would have been a terrible waste to design the puzzle first only to find out that the setting was impossible to create. Fortunately I found a way, but I was very limited on what I could put where. Still, you wouldn’t know it from what is there.
4-3 | Screenwrap Switchback
Code: RW8-GBM-Y8G


This level emulates the screenwrap mechanic found in Super Mario Bros. 3, minus screenwrapping Mario, of course.
Kick the shells off one side of the screen, and they “appear” on the other.
This is a sequel to my earlier course Screenwrap Scramble, which can be played as a bonus special course at the end of this game. Careful, it has a less than 1% clear rate.
This new level is designed to be easier. Also, thanks go out to Space_Pig for the shell kicker machine.
4-4 | Roy’s Pinball Palace
Code: H53-DG8-RXF


Castle 4’s boss Roy is the pinball in this working pinball table! This is probably my favorite level I’ve made to date and I’m insanely proud of this boss fight because of how well it reads on screen.
A casual player can tell what’s going on and the outcome is not RNG. It requires you to flip the thwomp levers to catapult Roy to the ceiling where a shell tossed by Mario can hit the boss. Roy will then teleport back down into the playing field.
But be careful of the spinies if you can’t flip them out of the way in time! If you can, and if you last long enough, you can turn this table into an infinite 1-up machine which will be helpful if you plan to tackle the special courses in the next world.
The rest of the castle introduces you to each of the mechanics used in the boss fight, including pinballing enemies, shell kicking, catapulting objects, and spin jumping over spinies.
All of World 4 takes place in the sky, and the castle introduces giant enemies, borrowing from Jack and the Beanstalk. And when those enemies pinball through the maze-like castle interior they can open up new pathways leading to exterior platforming sections in the sky among the castle ramparts.
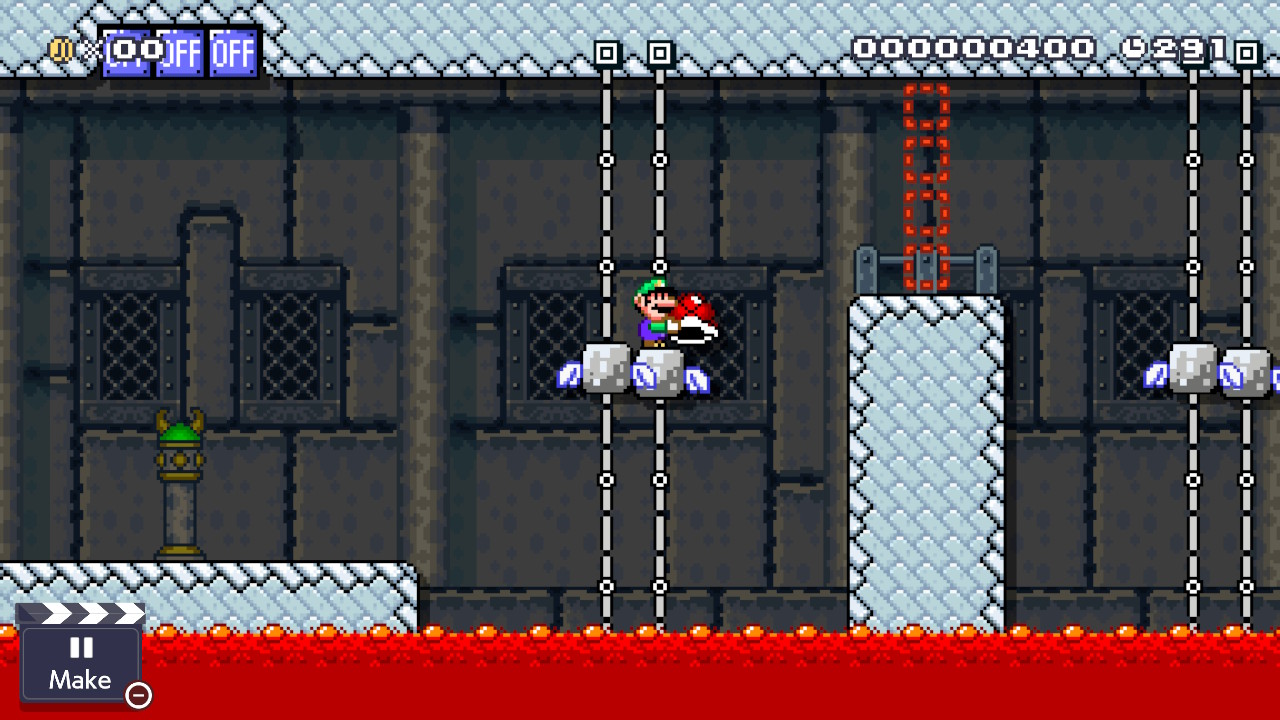
5-! | World Secret [WS]
Code: T40-S89-TJG


The gateway to the special world is this combination lock. It’s optional and you can advance straight to the final level if you don’t know the combination.
To unlock the path to the special courses, hit the correct kinds of enemies and you’ll open the gate to the end of the level. One enemy type can be found in each of the hidden “WS” rooms hidden in previous levels, so you’ll have to find all four rooms to open the lock.
If you haven’t found them before getting to this point, you can go back through my uploaded levels to find the correct levels to replay. There are four and they are marked with [WS] in the title.
I have also included a notification system to indicate if you have entered the correct code or not. The red mechakoopa spawns from a noteblock and hits the bottom music block if the wrong code is entered, and is destroyed if the correct code is entered. This is an improvement I added over existing combination locks I have seen in popular Super Worlds, which didn’t have an indicator for how long you had to wait before you knew whether you had entered the correct code or not.
I have included a screenshot of the entire setup so you can use it for yourself. Please note that the combination solution in the screenshot is not the one used in Super SWChris World. 🙂
If you have set it up the way I did so that you have to hit 4 enemies, that gives you 70 possible combinations. Not the most secure, but enough to be effective against brute forcing in this kind of game.
5-1 | Sea Shell Shoals
Code: 501-193-P2G


This is the first special course in the game. To play this level in the game you have to unlock the combination in World 5-!.
This was also the first underwater sky tree level using the frog suit that I made to originally slot into World 3. But it was far too hard for that point in the game, so I moved it to here and built a new water level for World 3.
You must remove the obstacles to the shell traveling along the bottom or top of the screen before it is crushed or blocked. That’s the only way to unlock the exit pipe at the end of the world.
This was my attempt to take the sky tree concept as seen in kaizo levels like Fangorn by Barb and put it underwater. How did I do?
5-2 | Screenwrap Scramble
Code: 50R-BJH-TFF


This is the second special course in the game. To play this level in the game you have to unlock the combination in World 5-!.
I originally made this level out of two desires; to see if I could emulate the screenwrap mechanic from Super Mario Bros. 3, and to make a sky tree level like Fangorn from Barb’s Grand Poo World kaizo romhack.
I know that at this point in the Mario Maker franchise sky tree levels are clichè, which was why I added an original twist to it in the form of the screenwrap mechanic, and why I tried an even more original twist in my next sky tree by setting it underwater (see World 5-1!). Besides, I made both levels for my own enjoyment and couldn’t care less if anyone still thinks they are clichè.
The screenwrap mechanic works by a shell hitting an on/off switch on one side of the screen, which in turn kills that shell and simultaneously releases another shell on the opposite side of the screen. The transition points are marked by pink bumpers so you can easily see them.
Screenwrap Scramble is a bit of a cheat because it’s not a new level. I had already previously released this level as a standalone, but it included accidental cheese in the form of a turn block that I somehow deleted from the vine’s path while testing it. This let the player carry the shell through a section of the level they shouldn’t have, giving them a bit more leeway to reach the top than intended.
This version fixes that, and makes one or two other minor adjustments to clarify what the player needs to do.
5-3 | P-Drop
Code: 77Q-B7R-JBG


This is the third and final special course in the game. To play this level in the game you have to unlock the combination in World 5-!.
I’ve never seen a P Switch drop a flying Spike Ball to the ground before, so I made this level.
I randomly discovered this mechanic when I was experimenting with ways to make a raccoon flying “don’t lose P speed” type level, and I happened to hit a P switch just as a flying Spike Ball was underneath it. The ball dropped to the ground.
Pretty cool!
I ended up ditching the Raccoon Mario bit because it seems really difficult to keep P speed when you’re bopping off of P Switches. So it turned into a kaizo-ish jumping level.
Still, I like the way you have to loop around through the level and retrace your steps. It doesn’t move in a straight line from left to right. I also love the bit at the end where you have to drop a Spike Ball so that it clears away the blocks obstructing the vertical path to the goal, but then you have to climb around and drop down from the top, which is the opposite direction the ball went! I haven’t seen that before, either.
The only thing I’m not completely happy with is the final jump, which is off a Green Koopa surrounded by spinies. It doesn’t look elegant and there’s a small possibility for a talented player to cheese it, but it’s the only way I could get the vertical drop setup to work the way I wanted. That may not make sense to you if you haven’t seen the level played*, but surely there is a better way to make it work.
Regardless, I hope this level serves as a worthwhile demonstration of an apparently newly-discovered game mechanic.
*There’s a better order of jumping on the goombrats at the end to line yourself up for the drop.
5-4 | “Wed Donkey”
Code: TV1-C0W-JLF


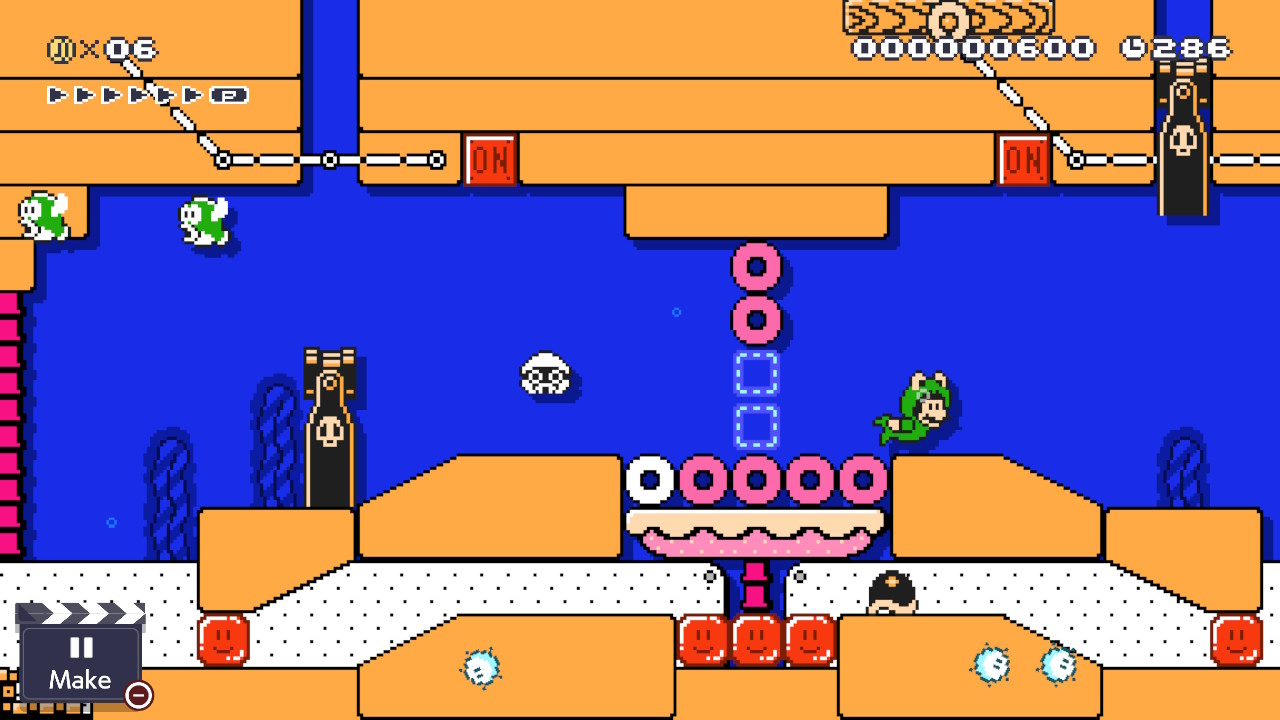
This final level is a three phase boss fight plus a credits section and yes, the title is absolutely a callback to the Baby Bowser fight at the end of Yoshi’s Island.
See, Bowser Jr. is walking the same path as his dear old dad. He wants a pet. The level begins with Phase 1 of the boss fight and we discover Bowser Jr. riding a giant Wiggler. Looks like he kidnapped Red Yoshi so he’d have a red “donkey” to ride around on when he got bored of the Wiggler!
After bopping the spoiled Koopa brat on the head 3 times, Mario frees Yoshi from his egg and pursues Bowser Jr. down an elevator shaft in Phase 2. Except Mario and Yoshi have to use the stairs, which have started freezing over with ice blocks. They’ll have to clear them out with Yoshi’s breath and bop POW blocks to give Bowser Jr. the old one two and help bring his castle down around him.
I made this phase a deliberate callback to the chase sequences in Levels 1-1 and 1-4. I think there’s something thematic and poetic about it.
Hopefully I’ve balanced the challenge of dodging the falling ceiling, draining lava floor, and Bowser Jr. fireballs while you’re also clearing out ice blocks and hitting POWs so that you won’t become frustrated. When the player has that much to worry about, I think you necessarily have to minimize enemy count and use a simplified level structure, so that’s what I did.
It was also tricky to build the level structure in a way that Bowser Jr’s fireballs wouldn’t trap Mario and force him to take a hit. In this way the ceiling and lava floor are a boon because they virtually guarantee that the player has to be within a few blocks of area I was in at any given time while I was testing. So as long as the fireballs were where I wasn’t, it meant that they likely won’t trap any other players, either.
Phase 3 is a classic Super Mario Bros. style boss fight on a bridge, except the bridge is made of ice blocks. You can easily defeat Bowser Jr by firing the bridge, but you’ll likely have to sacrifice Yoshi to get across. 😈
Or you can stomp on Bowser Jr.’s head 3 times. It’s up to you!
Escape the castle to trigger the final scripted cinematic where the castle collapses to the ground. Then enjoy an easy platforming level as you read some of the names of people whose tech and inspiration helped me make these levels. Break the goal tape to rescue Princess Peach who is locked away inside of the cottage at the end.
There’s a curious pit there at the end. Don’t know why. Just pointing it out in case you decide that red is no longer your favorite color. 😇